The stock intercooler on a Saab 900 turbo tends to get heat soaked after boosting only once and it takes minutes to recover. In the winter time heat soak isn’t as noticeable but in the hot summer months power would drop off noticeably after the first boost. The intercooler would quickly heat soak, and the engine would be choked with hot air leading to knock and lowered boost from the APC. I decided to upgrade the stock intercooler to a large 3″ thick front mount intercooler a few summers ago. After installing the front mount intercooler I could boost repeatedly without a noticeable drop in power. Read on to learn about the some of the details of installing a large intercooler a classic Saab 900 as well as my impressions after driving the car with the intercooler for a few years.
Planning the Saab 900 intercooler install
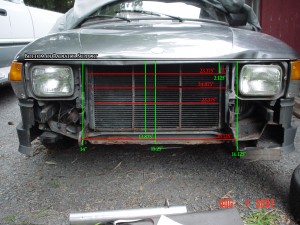
After I decided that I needed to upgrade the intercooler, the next question was how big could I go. I wanted to install as big of an intercooler as possible without cutting the SPG’s front valence, without interfering with the headlights or the hood closure. After doing some measurments and inspecting the area I realized that I would need to cut the tow hooks in order to install the intercooler tubing. This probably isn’t the best idea for a car that eats transmissions for breakfast but I’ve been lucky enough to have been able to limp my Saab home after grenading the transmission several times. I had previously removed the air conditioning system for reasons of weight savings, mechanical simplicity and engine aesthetics so this allowed me to install a larger intercooler. I created the following diagram showing some of the measurements I made on the front of my fathers $150 1986 Saab 900 SPG a few years before I started my install (yes I admit I had been dreaming of installing the intercooler for some time). You might find these measurments useful when doing your own intercooler install on your Saab 900. These measurments helped give me a rough idea of what intercoolers would fit, but I would recommend making your own measurements as these measurements weren’t done with pinpoint accuracy.
The Solution
The intercooler I decided to purchase as described as “Universal Intercooler 25 x 12 x 3 delta fin 3″ on ebay. It is 25″ from inlet to outlet. The actual core measures 18″ x 12″ x 3″. The inlet and outlet are 3”. In hindsight the 3″ inlet and outlet were overkill as the piping I used was only 2.25″ on the inlet side and 2.5″ on the outlet. An intercooler of the same size but with 2.5″ inlets and outlets would have been more appropriate. You could also make a very good argument that an intercooler core of 2.5″ would have provided enough cooling capacity, but the 3″ fit.
Intercooler Tubing
I did some rough estimates with the tubing and drew up a diagram for myself. I went with a silicone coupler off of the turbo reasoning that it would provide some flexibility when routing the tubing. I used slightly smaller aluminum tubing 2.25″ from the turbo to the intercooler because I thought it would cut down on lag, and 2.5″ tubing from the intercooler outlet to the throttle body to allow the air to flow freely out of the intercooler. Here is a summary of what was used starting from the turbo to the throttle body.
- 90 degree silicone elbow 2″ inlet (turbo side) – 2.25″ outlet
- 2.25″ aluminum tubing with a 90 degree bend and long ends cut to length
- 2.25″ silicone coupler with hump (the coupler with the hump allows for some flex. A straight coupler does not flex).
- 2.25″ aluminum tubing with a 90 degree bend and long ends cut to length
- 2.25″ to 3″ silicone coupler (leading into the intercooler)
- 3″ to 2.5″ silicone coupler (leading out of the intercooler)
- 2.5″ aluminum tubing with a 90 degre bend and long ends cut to length
- 2.5″ silicone coupler with hump
- 2.5″ aluminum tubing with a 90 degree bend and long ends cut to length
- 2.5″ coupler to 2.25″ coupler (stretched to fit over a 1990 intercooler tube.
- stock intercooler tube from a 1990 900 turbo cut slightly so the 2.25 silicone coupler could be stretched to fit over.
- Stock intercooler tube leading to the inlet (with Tial BOV)
- Stock rubber throttle body coupler
note: I had previously mounted a Tial BOV on an intercooler tube from a 1990 Saab 900 turbo so I reused this tube for the install. The last 3 items in the list above were to accomidate this. The later model intercooler tubing is closer to 2.38″ (slightly bigger than 2.25″ tubing and slightly smaller than 2.5″ tubing) I know this is a slight bottle neck as the tubing steps from 2.5″ to 2.38″ and up to 2.75″ at the throttle body inlet but I didn’t have the extra cash pay a welder to reweld the Tial flange on another pipe and I figured power loss could be negligible.
Also a variety of stainless steel t bolt clamps were used on each of the couplers. None of the aluminum tubing had any beads on them. I just clamped the t bolts very tight and they don’t come off. The aluminum tubing is unpolished 16 gauge industrial aluminum tubing.
The Install
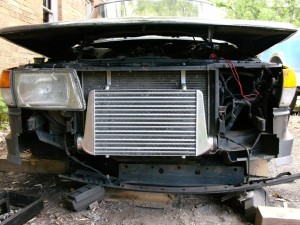
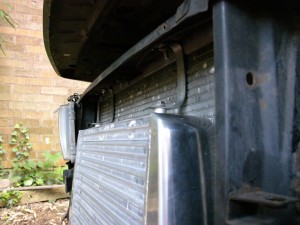
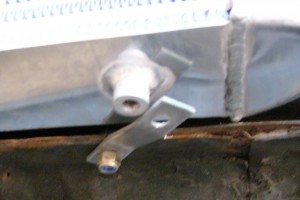
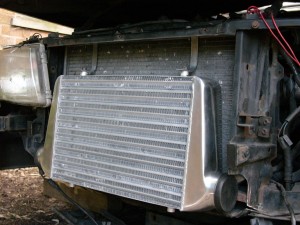
After removing the front bumper, fog lights, grill, and lower valence I held up the intercooler to get a feel for where it would be mounted. I created some simple mounting brackets out of some steel from Lowes.
The only issue I had with this mount was that I drilled the hole on the drivers side of the radiator crossmember without thinking about the position of the hood release cable. This slightly changed the position of the hood release cable.
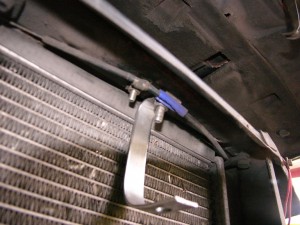
The mount slightly changed the position of the hood latch. A small section of silicone hose protected the hood release cable from abrasion.
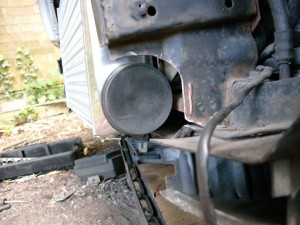
After the position was set it was obvious the tow hooks had to go. The first step was to break out the dremil tool and start cutting. After cutting I touched up the bare metal with paint.
The lower mounts were made with the same material as the top mounts. These mounts are as solid as they need to be and I haven’t had any problems with the intercooler moving around.
At this point the intercooler was solidly mounted. I just had to figure out how to install the tubing.
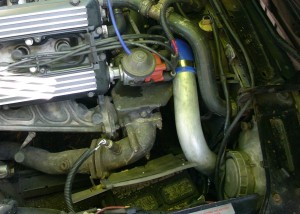
Starting from the turbo I installed the 90 degree silicone elbow. This allowed me to start the bend closer to the turbo than if I used a straight coupler and a 90 degree pipe. I cut the upper radiator hose slightly where it meets the radiator to give some extra room, I also bent the turbo heatshield down slightly which provides some extra room. As you can see in the image below there is not much clearance between the intercooler tube and distributor, but it does fit. It requires some pushing and tugging on the intercooler hose to remove the distributor cap but it works. The 2.25″ tubing helped with the fitment. Also notice how close the tube passes between the back of the ecode headlight and the battery. The tube gently rubs on the back of the ecode but does not damage it. Beneath the light there is a 2.25″ humped silicone coupler. This type of coupler has a hump in the center to allow the tubing to move in relation to eachother. This allows you to fit the tubing even if they are slightly misalligned, and allows some room for the pipes to move a bit when the engine moves on its mounts. Straight couplers would have been harder to fit and wouldn’t have had as much give. Below this there was another aluminum 2.25″ tube with a 90 degree bend and a coupler (2.25″ to 3″) to connect it to the intercooler. This was the first and only hose I’ve ever had blow off under boost. The 3″ intercooler inlet allowed very little space to put your hand in to reattach the cupler. This is a high pressure point in the system and its prone to blowing off under boost. Besides clamping the hell out of it, I devised Macgyver like way to hold the pipe and coupler on here permanently. It has never blown off since. I don’t have any picures of my solution for holding on the intercooler pipe but if you are interested let me know.
On the outlet of the intercooler I have a 3″ to 2.5″ coupler and a 2.5″ aluminum tube with a 90 degree bend. Beneath the headlight there is a 2.5″ humped silicone coupler which allows some flex in the system, and this leads to another 90 degree aluminum tube. I already had a Tial BOV mounted to a Saab 900 intercooler tube from a later year so I finished off the install with this pipe.
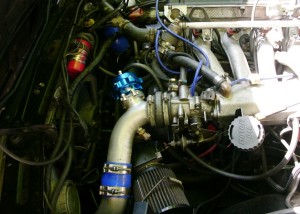
This is the intercooler tubing on the cold side (intercooler to intake) of the intercooler installation on my Saab 900 Turbo
Results of Installing a Front Mount Intercooler on a Saab 900 Turbo
There are a few things I don’t like about my particular intercooler installation. I think there are too many couplers and thus too many opportunities for leaks although I’ve never had any leaks. I could probably improve this by welding up some custom intercooler tubing. Also the intercooler tubes are a tighter fit than I would like and they make changing the cap and rotor a bit more difficult. In hindsight I don’t think cutting the tow hooks is a great idea on a car that has already grenaded several transmissions. Also global warming has become more of a problem than I first thought and maybe I should have gone with a thinner intercooler and kept the air conditioning system. I did notice some cooling problems after the install but this is most likely due to an electrical problem causing the fans to click on late.
Overall I am very happy with the intercooler installation on my Saab 900 SPG. After installing the front mount intercooler I noticed that the boost was lower with the front mount intercooler but it felt more powerful. The power felt smoother and the power delivery felt more linear. I was able to boost repeatedly without heat soaking the intercooler. This was the main benefit. Before I would boost once and power would drop dramatically until the intercooler cooled off for a few minutes. Now I can boost again and again without a large drop in power. The intercooler will still heat soak when sitting in traffic but it cools quickly when moving. The engine also felt more responsive. I rarely have engine knock with the new intercooler. If your serious about modifying your Saab 900 turbo then you need to upgrade the intercooler. Besides it looks mean sitting behind the grill.


[…] mount intercooler I more or less followed this recipe which is pretty thorough and gives you a list of parts to buy. I put more work into fabricating […]